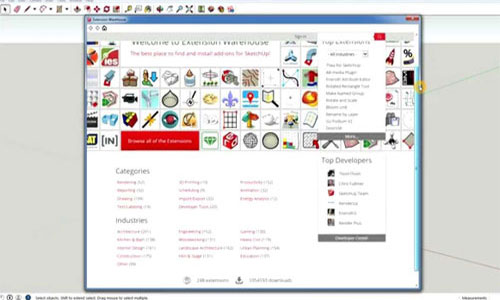
Monday, July 31, 2017

Checkup to Detect Errors for SketchUp2017

SketchUp is evolving with time to meet the ever-changing requirements of the promising designers. With launching new features and tools, it has made an indisputable place among the existing applications. With a promise to offer a better accessing point and interface, it changes its inner complications to make the application user-friendly. In 2017, SketchUp has launched new software –SketchUp 2017 Checkup – to meet the growing queries of designers in respect to the SketchUp compatibility on windows. This software allows SketchUp followers to know whether their computer system is suitable for SketchUp designing or not. It finds out the reasons why SketchUp is not working on a system so that you take necessary steps to solve them. This application also creates a file which can be decoded by the support team of SketchUp in order to help the users with providing the needed solutions.

CheckUp Running: You need to install the application first to run the checkup on your system. Choose the ‘Run SketchUp2017 CheckUp’ as the last option while installing it. However, you can run the Checkup application anytime with selecting desktop icon button at the time of installation. Once 
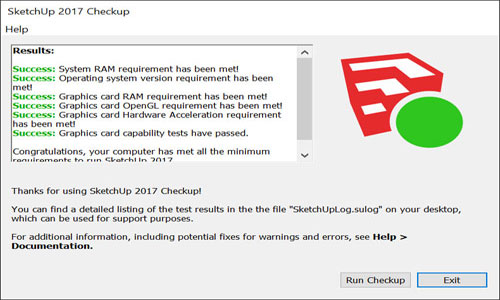
the installation process completes, choose run Checkup button. The result box would appear on the completion of the process that lets you know what factors make problems for SketchUp in your system.

Decode the result:

Success: CheckUp application shows ‘Success’ for every successful test. This means the computer has no issue related to the test the application passes.
Errors:

1. Error: ‘Hardware acceleration is unsupported or has been disabled on your graphics card. SketchUp requires that you use a hardware accelerated card’
If Checkup shows such message, this means you need upgrade graphic card driver of your system. It accelerates your graphic card and makes your system compatible with the SketchUp design.

2. Error: ‘Your graphics card's OpenGL version is 2.1(changes as per the version). SketchUp requires a graphics card that supports OpenGL 3.0 or better.’
SketchUp 2017 does not work on the computer having lower than 3.0 versions. To get rid of this issue, upgrade your graphics card driver is the ultimate solution you have as updating drive upgrades OpenGL 3.0 version as well.

3. Error: ‘Tests that exercise your graphics card's capabilities have failed.’
Your graphic cards need to be capable enough to support every task of SketchUp 2017. It must support the rendering function which is needed to display SketchUp models. Checkup application tests compilation of SketchUp GLSL shaders and support of OpenGL framework. If your system has a compilation error in the mentioned checks, then you should think to update your graphics card drive

4. Error: ‘Your computer's system RAM is .SketchUp requires 2GB or more of system RAM’
For having a smooth performance of SketchUp, you must have 2GB or above RAM for your system. Though, SketchUp can run on the system having RAM lower than that. In this case, the application reduces the performance level significantly.

5. Error: ‘Your operating system does not meet the minimum operating system requirement. SketchUp requires Windows 7 or higher.’
For SketchUp, you need windows 7 64 bit or higher version. SketchUp 2017 does not permit you to install it on the lower version of operating system.

6. Error: ‘Graphics card has MB of graphics card memory. SketchUp requires a graphics card that has 256 MB or more of memory.’
SketchUp needs 256MB or above graphic card memory for giving you a smooth way of performing SketchUp.

7. Error: ‘System RAM or Windows Version or Graphics Card Memory is missing.’
Checkup application shows the above error in case it does not find the proper information it is looking for. Update your graphics card driver to improve the performance.
Warnings: The warning message is given when Checkup passes the test but detects a warning condition. In such a circumstance, SketchUp would run on your system, but the performance would be not as efficient as it generally is. Warning message alerts you to take the needed action to improve the workability of the designing tool.

1. Warning: ‘Your computer's system RAM is .SketchUp recommends 4GB or more of system RAM. Performance may be significantly impacted.’
SketchUp needs 4GB or above RAM for a ceaseless performance. Lower RAM may allow you install the application, but its performance will be reduced.

2. Warning: ‘Your graphics card has MB of graphics card memory. SketchUp recommends that your graphics card has 1024 MB or more of RAM. Performance may be significantly impacted.’
SketchUp requires 1024MB graphics card RAM. If your system has one lower than mentioned limit, it informs you to upgrade it.

3. Warning: ‘Your graphics card has a depth buffer that is less than 24 bits. SketchUp recommends a 24 bit or more depth buffer for your graphics card. You may see display issues with your current configuration.’
The message is given in a clear way for your understanding, and it also presents what you should do to avert the problem.

4. Warning: ‘Your graphics card has a color buffer other than 24 bits. SketchUp recommends a 24 bit color buffer for your graphics card. You may see display issues with your current configuration.’
You may face display issue if you have a color buffer lower than 24 bits. Upgrading of which solves the problem.

5. Warning: ‘Your graphics card does not support stencil bits. Shadows may display incorrectly on your current configuration.’
Graphic cards with stencil bits are best to get a proper shadow in your SketchUp designs. If you find incorrect shadow that means you need to add stencil bits for designing purpose.

6. Warning: ‘SketchUp has detected you are using () when your system is capable of using an AMD or NVIDIA graphics card () .SketchUp will likely perform better if you change your system to use the AMD/NVIDIA card.’
A multiple GPU system needs AMD/NVIDIA card to run SketchUp application.


7. Warning: ‘System Ram or Graphics Card Memory or Depth buffer or Color buffer or Stencil buffer information is missing.’
This message is being shown when the above-mentioned conditions (missing of Depth buffer, Color buffer and Stencil buffer) happen. Take the necessary steps to solve the problem.

Checkup to Detect Errors for SketchUp2017


~~~~~~~~~~~~~~~~~~~~~~~~~~
Published By
Rajib Dey
www.sketchup4architect.com
~~~~~~~~~~~~~~~~~~~~~~~~~~

How to install Plugins in SketchUp

This is guidance for everyone who has just begun to explore to vast world of plugins and new to SketchUp. You all can find every possible method for installing plugins in SketchUP. It is trouble free and easy. It is also familiar for the BEGGINER users who use various apps and dig about their computer innards.

There are some of our much known communities driven, like Plugin Index, Didier Bur’s Ruby Depot or Smustard; you can choose one from them. But installing these for the first time it can be little tricky for new users and sometimes it can be frustrating when the things are not clear from the outset.

1. Installing RBZ files in SketchUp: After the release of SketchUp 8 M2 the clever folks at SketchUp introduce a new file format (.rbz) which made installing plugins a one click operation so that you can install plugins from within SketchUp itself.

Click the Window menu and select Preferences to display a dialog box. Then select Extensionsfrom the sidebar lists to active and inactive plugins currently installed. Then click Install Extension to navigate to the .rbz downloaded file. A warning dialog will ask to confirm to install this plugin and make changes your file system. Click Yes and the installation will be successful.

2. Installing RB files in SketchUp:The.rbformat is a simple text file written in the ruby language that is saved as a ruby file. These can come in varying complexity. Some are in simple single file that will add a menu item. While others contain folders with multiple files in zipped format that may add toolbar and all sort of goodies. Whether it is about PC or Mac users first they have to select the location of SketchUp Plugins folder.

Mac users need to know that it is a common misconception that the plugins folder is located with the SketchUp package.
With our plugins folder installing any plugin is a simple drag and drop procedure from your default browser download folder location to the SketchUp Plugins folder. If SketchUp is already running just restart it to appear of plugin.


Please follow the link for further details: sketchucation.com

How to install Plugins in SketchUp


~~~~~~~~~~~~~~~~~~~~~~~~~~
Published By
Rajib Dey
www.sketchup4architect.com
~~~~~~~~~~~~~~~~~~~~~~~~~~

Milling Tools – The newest sketchup extension

Thomas Thomassen has developed an exclusive sketchup extension alias Milling Tools. It supports SketchUp 2014, SketchUp 2015, SketchUp 2016, SketchUp 2017.

It can be used to generate Dog-Bone fillets, take out 2D profile out of 3D parts for laser/CNC cutting. It is mostly suitable for engineering and woodworking sectors.
Dog Bone Fillets: Generates Dog-Bone fillets on the faces clicked by you.
• Apply VCB to fix the radius of the tool.
• Apply VCB to fix arc segment quality. ("8s" will create arcs on the basis of circles containing 8 segments)
There should be no connection between the face clicked on and any other faces or edges.
Part abstraction for CNC/Laser cutting
Instigated from a thread (forums.sketchup.com) from the SketchUp forum.

Abstract Parts: Choose a set of 3D parts, the faces on the ground plane of each instance will be withdrawn to a 2D profile.
Modify Part Height: Modify the depth of the chosen instance. It will shift the faces of chosen instances to the specified height from the ground plane.
Fix Ground Plane: A tool to opt for the new ground plane for the specified instance.

Menus & Toolbars
• Extensions » Milling Tools


Read more

~~~~~~~~~~~~~~~~~~~~~~~~~~
Published By
Rajib Dey
www.sketchup4architect.com

~~~~~~~~~~~~~~~~~~~~~~~~~~

Saturday, July 29, 2017

How to Make Quick 3D Models From AutoCAD to SketchUp

One of the main advantages of using SketchUP is the ability to produce very fast 3D massings for the recommended site. This enables the understanding of how the space works in 3Rd dimension. Very often it’s tough for designers and clients alike to understand the relation of the ground plane and how they inform one another.

The great advantage to use SketchUp Pro is the ability to import DWG files from CAD programs, using the line that has drafted in AutoCAD to build the model. After simply importing the DWG lines and making them surfaces, it will be easier to build a model in just a few minutes.

1. Drafting in AutoCAD: First, the easiest step is drafting in CAD. Whether it is traced from hand drawn lines or drafted on specific detail level, it is need to make sure that the lines are connected properly. SketchUP is fussy, in that if there is a break in the lines, it will not want to make it a surface. After making a clean drawing, it must be saved as a DWG.

2. Importing Into SketchUp: Next go to file>import in Sketchup. Only SketchUp Pro users can import DWGs, but SketchUp Make users are able to import JPGs. At first export lines from AutoCAD as a PDF, then convert them to a JPG. Then the file can be imported into SketchUp. From there it will be easy to trace the lines using drawing tools in SketchUp. This takes more time, but it can be effective. For SketchUp Pro users make sure in the import screen to click “options” and then match the SketchUp units with AutoCAD units.


3. Proofing and Making Surfaces: Go to window>model info>statistics, then “purge unused” as well as “fix problems”.


~~~~~~~~~~~~~~~~~~~~~~~~~~
Published By
Rajib Dey
www.sketchup4architect.com
~~~~~~~~~~~~~~~~~~~~~~~~~~

Verto Studio 3D for VR Is Done Now You Can Build 3D Models in HoloLens or VR

Vetro Studio 3D promises you to provide an ultimate thrill of 3 Modeling world by offering a real-time experience like nothing before. Michael Farrell, the owner of Verto Studio LLC, develops the application to remove certain shortcomings today’s 3D designing applications generally have. It works to bridge the gap between XR 3D modeling and the quintessential desktop 3D modeling packages. The HTC vive and Oculus Rift versions have seen improvements with the announcement.

The surge in mixed reality technologies leads us to the world of dimensions where we can stroll around in the virtual 3D world like our existed real world. A demand for new technologies and tools has been felt to make the world even sharper and subtle. Every designer at their early stage might face the difficulties of converting 2d designs into a real object of 3D space using CAD and 3D modeling. 25 years has been spent in discovering a tool that can be termed as a proficient solution of designing virtual objects in 3D. Verto Studio 3D is the name that breaks all limitations of 3D designing and provides an uncompromising platform where designers not only design but also feel their 3D models.

With this 3D modeling package, a designer gets invaluable knowledge of shape, measurement and other related things with experiencing their 3D models in the virtual space. The Verto Studio VR for HoloLens and windows Holographic design ensures that you get the real fun while designing 3 D models in holographic 3 D modeling studio developed with reality tool.

The application supports a wide range of file domains like FBX, DAE, OBJ, and STL that allow users to import different mesh models or design their own objects. With this application, users can transform desktop support or tablet support 3D files into hologram-capable files. A built-in cloud integration certifies users to access to users’ documents for both export and import fields.

Features offered by Verto Studio 3D:
• DAE,OBJ,STL,FBX file import
• Verto Studio file format support via Verto Studio Cloud or Other Cloud Services
• Polygonal Mesh generation
• Plane
• Cubes
• Spheres
• Toruses
• Cylinders
• Terrain generator (height field)

• 3D Sketch tool
• Mesh Augmentation
• Polygon reduction
• Polygon extrusion
• Polygon subdivision
• Texture coordinate editor
• Editing features
• Vertex Translation/Rotation/Scaling
• Metric display of position & size measurements for 3D holograms
• Mirror
• Material editor
• Texture mapping
• Undo
• Multiple Real-time shading modes and rendering of diffuse & bump texture maps
• Real-time scaling, moving, rotating, panning, auto scene re-orientation

Verto Studio 3D for VR Is Done Now You Can Build 3D Models in HoloLens or VR


~~~~~~~~~~~~~~~~~~~~~~~~~~
Published By
Rajib Dey
www.sketchup4architect.com
~~~~~~~~~~~~~~~~~~~~~~~~~~

Friday, July 28, 2017

Selection Toys – The newest extension for sketchup

Thomas Thomassen has developed Selection Toys for sketchup. This newest sketchup extension is compatible with SketchUp 6, SketchUp 7, SketchUp 8, SketchUp 2013, SketchUp 2014, SketchUp 2015, SketchUp 2016, SketchUp 2017 as well as Mac and Windows platform.

With this sketchup plugin, the users will be able to generate, control and refine selections.
This plugin comes with a wide array of selection modifiers to filter out all edges, faces etc. It allows you to instantly choose entities containing identical properties like material, layer orientation etc. Besides, it allows you to pick up same instances of the identical Dynamic Component.
Tools
Select Edge Loops — (1.14.0)
Access: Tools -> Selection Toys -> Select Edge Loop

This select tool can be used to opt for the loops of a face. The normal Select modifier keys are applied to insert/remove/toggle their selection. Loops belong to either the bounding edges of a face or a hole in a face.
Components
Select Instances - Selects all the instances of the designated component.
Select Active Components - Selects all the instances in the existing work space exclusive of all which are nested within other components etc.

Select Active from same Layer - Selects all the instances in the existing work space of the designated component that remains on the similar layer.
Select All from same Layer - Selects all the instances of the designated component that remains on the similar layer.


To download this plugin, click on the following link extensions.sketchup.com

Read more

~~~~~~~~~~~~~~~~~~~~~~~~~~
Published By
Rajib Dey
www.sketchup4architect.com

~~~~~~~~~~~~~~~~~~~~~~~~~~

Yulio launches SketchUp plugin

It is a brief description about the Yuilo Technologies’ newly launched SketchUp plugin that will change the view of the designers and develop their designs.

Yulio Technologies has announced the launch of its new Sketchup plugin, a tool developed to enable SketchUp users the ability to instantly create detailed and immersive virtual reality experiences (VREs) from their designs. These can then be shared with clients or remote collaborators.

According to Yuilo’s managing director, Robert Kendal Yulio’s goal has always been fully democratize the use of VR within A&D and put tools to create VR experienced in every designer’s hand. While developing the SketchUp plugin, they worked incredibly hard to develop a tool that’s 100% accessible to every user s and designer’s transition their work from 2D renders in CAD to VR ready files seamlessly and lightening fast.

It is also said that designers are utilizing the communication ability with clients via virtual reality mediums that begun to grow steadily in popularity as they could give clients a better experienced design than before.
According to Yulio, there are a few tools that can create VREs from SketchUp renders, but it is also said that the entry level costs for these plugins can be up to $600-$2000 for enterprise licenses.


But there is a news also that the downloading of it is free of cost for all Yulio users. The company also said that it was designed to be fast and it will provide greater realism than the previous VR realism while viewing the designs.

Yulio launches SketchUp plugin


~~~~~~~~~~~~~~~~~~~~~~~~~~
Published By
Rajib Dey
www.sketchup4architect.com
~~~~~~~~~~~~~~~~~~~~~~~~~~

Pre-Release of Carbon Scatter and CloudFactory Ozone 2017 Plugins by E-on Software

E-on Software is one of the leading development companies renowned globally. Lauded with many successful ventures in the field of creation, animation, rendering, integration of natural 3D environments, VFX, architecture, and gaming industry, it made a strong foothold in the minds of designers and artists with their sheer creations and sharp edges of designs. Surprising everyone’s with their offering, E-on Software announced that it pre-releases Carbon Scatter and Cloud Factory plugins for its members.

The company also announced that it will discontinue the developments of Carbon Scatter and Cloud Factory in 2018 for introducing a better user interface and customer experience on flagship solutions – VUE and PlantFactory.

The new releases, like before, come up with new changes that provide users with an improvement in 3D designing. The company also announced that those who have a valid maintenance plan for Carbon Scatter or CloudFactory Ozone will get the pre-releases for free in coming days.

Carbon Scatter: This software has made design easier with adding nuanced details to your design that makes it even more interesting to explore. This proves to be very handy for those who love to add original detailing to their application. With a wide variety of options, you can create wind-swept forests and animated crowd in no time. Above all, you can render them directly in 3D Max, Maya and Cinema 4D.

Features offered by Carbon Scatter:
• Get millions of instances instantly.
• Render with any rendering option you have.
• Use huge plantFactory models and change them with Plant Editor.
• Animate instances such as adding wind in plants.
• Customize placement, height and size with bitmaps or procedural gaps
Besides the above-mentioned features, the software comes up with an array of benefits that not only make your drawing attractive but also real for viewers.
The new release of Carbon Scatter has come up with more advanced looks of existing features. The advancement in the areas like:
• Global EcoSystem layers work as EcoPainter Brushes.
• PlantFactory and VUE vegetation models are now directly available in Carbon Scatter EcoSystem populations.
• Higher performance with up to 4xlighter data footprint with quicker loading/saving of scenes.

CloudFactory Ozone: This plugin for 2017 help you design and render realistic skies and atmosphere with high accuracy. This tool is infused with cutting-edge technologies designed by ace developers of E-on software. These plugins add accuracy in your detailing and make your design more realistic than before. It mimics the natural environment and acts as per nature’s rule.

With this, you earn as many as 100 preset atmosphere and cloud shapes that allow you to carve your design as per your dreams. With five atmospheric models (photometric, spectral, volumetric, standard and environmental mapping), it is successful in offering realistic environment to your designs What you get in CloudFactory Ozone 2017:

As revealed by E-on software in their official press release, you get benefits like:
• Auto-scale clouds with altitude
• Easily load/add cloud layers using a single button
• Optional automatic sun softness computation, based on atmosphere parameters
• "Improve Low Quality Consistency" parameter to better preview your atmosphere looks while rendering at a lower resolution
The above-mentioned information is written as per the news released by E-on software itself. For more details about pricing and availability of Carbon Scatter and CloudFactory Ozone, visit www.e-onsoftware.com


E-on software is a leading digital company and has been creatively associated with many famous feature films like Strange," "Kubo and the 2 Strings," "Jupiter Ascending," "Minions," "Guardians of the Galaxy," "The Croods," "Dragons 1&2," "Hunger Games and more.

Pre-Release of Carbon Scatter and CloudFactory Ozone 2017 Plugins by E-on Software


~~~~~~~~~~~~~~~~~~~~~~~~~~
Published By
Rajib Dey
www.sketchup4architect.com
~~~~~~~~~~~~~~~~~~~~~~~~~~

Thursday, July 27, 2017

PlaceMaker on Sketchup Recreates a 3D City Model Just by a Few Clicks

Sketchup application is a phenomenon in the world of 3D designs with which you can give dimensions to your imagination. It is a thrilling experience to witness how your sketches turn into reality with using certain tools and features. Sketchup is a well-known platform for artists to transform designs into 3D sketches easily. There is good news for all Sketchup users as it extends its features that let designers draw things quickly and flawlessly. PlaceMaker is such a breakthrough extension that helps you create 3D models of any city across the world just by a few clicks.

Making easier the way 3D images of cities are designed, PlaceMaker has already got a huge interest with its wide areas of applications. For a comprehensive understanding of this tool, you have to have the idea about how it works. The steps are so simpler that even a novice can use the tool like an expert.

PlaceMaker imports maps of cities from OpenStreetMap and DigitalGlobe and brings them on the Sketchup platform. Everything is in a ready-to-use manner that requires only your preferences to complete the models of cities. With high resolutions images of aerials and roads, this tool is more than just a function to design 3D models.

Let’s take an inside look at the steps that take you into the virtual 3D land of your known cities:
• Go to the ‘Extension’ tab and select PlaceMaker dialog box.
• Click ‘Select a place’ tab and search your preferred location.
• Import that Location into Sketchup platform.
• Click ‘imagery’ to import high resolutions images. It costs you few bucks to download the images.
• There are options like ‘Building’, ‘Roads’, ‘Paths’, ‘water’, and ‘Trees’, clocking on which turns your sketch a complete map. These options come up with a drop-down menu that includes your criteria to be selected.
• Click ‘Make Place’ option that allows Sketchup to import everything you created on the platform, except imagery. These are a few steps that are behind a complete 3D model of places and areas across the world. In the world of the digital age, we all are more or less concerned about the importance of 3D maps of cities. Starting from navigation system to emergency management, 3D city models prove to be very helpful to locate an area in a more prominent way. 3D city models find its applications in some important domains like:
• Urban Planning and Architecture: 3D models work as a communicator between designers and urban planning development authorities to set up a concrete plan for the development of environment.


• Emergency management: to avert any kind environmental risks and disasters, 3D City models prove to be a great help to disaster management authorities.
• Gaming: to design the base of 3D locations for online and video games, this application provides you with the desired result.
• Real estate and property management – the 3D models play an important role management properties spread across many places in the world. PlaceMaker will definitely lift burdens from your shoulder while you are designing 3D maps for your cities. With a simple and easy condition to use, anyone can try hands in designing 3D sketches of their known places. Effective and trustworthy, this tool is acclaimed by designers all over the world.

PlaceMaker on Sketchup Recreates a 3D City Model Just by a Few Clicks


~~~~~~~~~~~~~~~~~~~~~~~~~~
Published By
Rajib Dey
www.sketchup4architect.com
~~~~~~~~~~~~~~~~~~~~~~~~~~

PlusSpec Draws Easy and Effortless Rules for 3D Designs in SketchUp

Simple yet stunning is what PlusSpec is for 3D designers and artists. This offers an easy and effective platform where designing seems as effortless as dreaming. This new update in the 3D world has started gaining responses from across the globe with all its right reasons including offering an effective 3D platform, making designs clean and comprehensive, and allowing everyone to sketch 3D and 2D designs creatively.

With a promise to make you efficient and professional, the software ventured out a new journey in the 3D paints. By definition, it is a combination of most popular designing software like 3D CAD, Building Information Modeling (BIM), Virtual Design & Construction (VCD), Real Production Integration and Integration Project Delivery.

This new software focuses on three major elements – designing, drafting and drawing, and communicating through designs. For any budding designer, this software proves to be a great help with its easy-to-use features and functions covering every need of today’s designers.

Designing with PlusSpec: SketchUp got a huge popularity because it saves time and cost of designing in 3D. This new addition follows the path of the former and brings in new tools that are magnificent and surprising for designers. PlusSpec is considered to be the only BIM software, with which you can design too. While the contemporaries of PlusSpec work as virtual drafting tools, it distinguishes from them for being a designing tool. It is no doubt to say that the software even suppresses the popularity of two renowned 3D Tools – 3D CAD and BIM. The maker revealed that it is the first VDC and designs customizable structure with adding sharp and sheer details.

Drafting or Constructing 2D Drawings: Professional drawing is no longer a work of an expert, thanks to the PlusSpec and SketchUp Pro. You can transform your dream models in 3D as quickly and prominently as an expert does. Maintaining the desired accuracy, the software lets you construct professional drawings for clients and Construction Documentation (CD). PlusSpec exclusively produces a 2D drawing set bringing plans, selections, elevations and details. Your 2D drawing also changes with the models. It eventually enhances your focus more on designing rather than modeling and drafting.

Communicate well with your designing intent: Communication through designs has become cleaner and more understandable for everyone. The tool is designed in such a way that you can eliminate the conventional designing error quickly and presents a design that communicates well with your clients. With 3D models of your construction, you will definitely stay ahead of others in expressing your designing spree.


Cost effectiveness: Architecture can understand the budget behind designing 3D models. Added to this, the design is subject to change many times; thus, it enhances the cost also. Whatever you design in PlusSpec has maintained a strong accuracy and is qualified automatically. Offering a true value of 3D, PlusSpec is more than just a 3D designing tool. With an easy-to-learn ability, it welcomes everyone associated with the designing world to transform dreams into the sketches and lines of dimensions. Simple to understand and with a better communication approach, this tool foresees the future of 3D designing and gives a glimpse of the coming days.

PlusSpec Draws Easy and Effortless Rules for 3D Designs in SketchUp


~~~~~~~~~~~~~~~~~~~~~~~~~~
Published By
Rajib Dey
www.sketchup4architect.com
~~~~~~~~~~~~~~~~~~~~~~~~~~

Some handy sketchup tips for newbie sketchup users

The newbie sketchup users will be greatly benefitted by watching the following sketchup video tutorial presented by Justin Geis. In this sketchup tutorial Geis will introduce you with top 10 sketchup tips.
1. Apply Keyboard shortcuts: Every tool in SketchUp is supported with keyboard shortcuts. You don’t require to click on icons to obtain different types of tools in sketchup through these shortcuts. Beside, these shortcuts can reduce your modeling time significantly.
2. Move along axes: It is frequently required to shift objects both up and down and left and right concurrently. While trying to shift an object in both directions simultaneously, your object may not proceed at the desired location. Therefore, it is suggested to shift your objects along the red and green axes initially, then along the blue axis (or alternatively), so that you can get your objects to shift according to your choice.
3. Move with inferencing (Kitchen Example): While moving objects throughout SketchUp, sometimes it become complicated to procure objects to go in the exact position in a 3D space as per your choice. To make this process simple, apply inferencing to shift objects around. Inferencing is SketchUp’s way of helping you move objects around. As for instance, when you prefer to move a table and chairs with the purpose of aligning them with the end of a cabinet – you can choose and shift your objects by holding the shift key to lock along an axis, then move the mouse over the cabinet end and click to set your objects in your desired location.
4. Utilize the 3D Warehouse: SketchUp contains an extensive library of free models which can be imported into your model instantly. Highlight your modeling time on modeling spaces, and download furniture and other interior objects from the warehouse as much as possible to save significant modeling time.
5. Model with groups: When objects do not remain in groups, faces are merged, you have to face problem. If you group your geometry, your objects will not be merged with other objects and you will be able to make modifications instantly and efficiently.
6. Model with components: A component belongs to an object and when you copy it, any modification occurred in one copy will be updated in all the other copies as well. If you wish to have more than one of something in a model, create it as a component. If it is not required to create a copy of something, it will be a group.
7. Use Copy Mode: The move tool and the rotate tool can be utilized to generate copies of geometry. By clicking the control key with these tools active, the copies can be produced.
8. Generate multiple copies simultaneously: Besides, producing single copies, the move and rotate tools can also be applied to generate multiple copies. While making a copy of an object, just type “*” and the number of copies to be produced, then press the enter key to generate that number of copies. It is possible to modify the number of copies by hitting “*” and a new number, then the enter key provided that the tool is still active.
Watch the video, presented by Justin Geis.
9. Generate equally spaced copies among two points (Fence Posts): Besides, producing multiple copies, it is also possible to set an end point, then hit the divided by key and put a number of copies to generate equally spaced copies among two points
10. Apply extensions: SketchUp and SketchUcation both contain extensive warehouses of extensions which can be set up in SketchUp to make its functionality superior. Use new extensions in spite of native tools, to extend your modeling skills.

Read more

~~~~~~~~~~~~~~~~~~~~~~~~~~
Published By
Rajib Dey
www.sketchup4architect.com

~~~~~~~~~~~~~~~~~~~~~~~~~~